This post may contain affiliate links. Read disclosure policy

Are you guys all caught up?
Week 1 we learned about what a lame-o I was when I started my photography journey. You don’t actually have to read that. It’s embarassing and probably boring.
Week 2 we learned all about the exposure triangle – how shutter speed, aperture, and ISO work together.
At this point you’ve hopefully read your camera manual and figured out how to change those settings when you’re in manual mode.
Today we’re going to talk about aperture, my favorite setting!
First, let’s go over some vocab words, so things don’t get confusing. (I’m a homeschooler, okay? I’m required to give you vocab words. I want you to use them each in a sentence, and I want neat handwriting! Kidding. Sort of.)
Bokeh : The blur in the background or foreground of an image.
Those colorful Autumn leaves make gorgeous bokeh in that image!
Depth of Field: The range of distance in a photograph that is “sharp” or in focus.
I’ll need a small depth of field if I want nothing but this cheeseburger to be in focus.
We learned last week that aperture controls how much light gets to your camera sensor. The smaller the number (f2 verses f8), the more light you’re letting in. If you’re aperture is a small number, we call it being open. That’s because the aperture is basically a hole that opens and closes. We open it up to let in more light and we close it down to keep light out. Make sense?
Now, the other thing that aperture controls is the bokeh.
Bokeh, my friends, is a beautiful thing. It’s the part of your photo that is blurry.
I love bokeh and my style of shooting is to have a lot of background (and foreground!) blur.
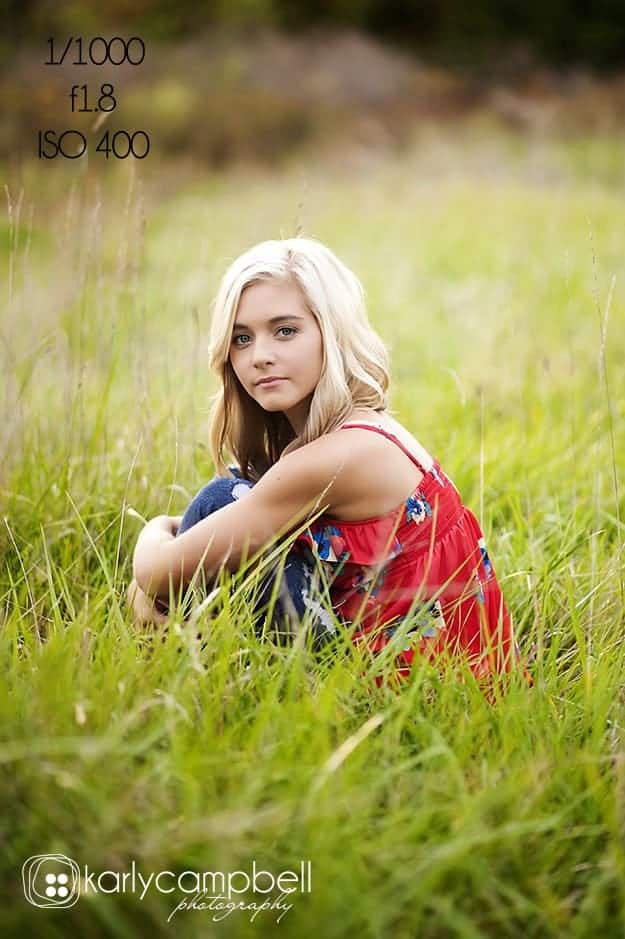
The above shot was taken wide open. Only my subject is in focus. The grass in the foreground is blurry and everything in the background is as well.
My shutter speed was plenty high. I had just come from an area of shade, so my ISO was up to 400 and I didn’t change it for this shot. I get lazy changing it sometimes. Don’t be like me. If I had been paying better attention I would have dropped it to 200 and lowered my shutter speed to 1/500 to make up for the change. My camera handles ISO like a dream, though, so sometimes I don’t pay super close attention. Whoopsie.
I try not to shoot so open with food. I’ll catch myself with just a tiny sliver of something in focus and realize that you guys probably would like to see more of the food. I try to stay around f/2.8 for my food shots when I’m using my 50mm. 1.4.
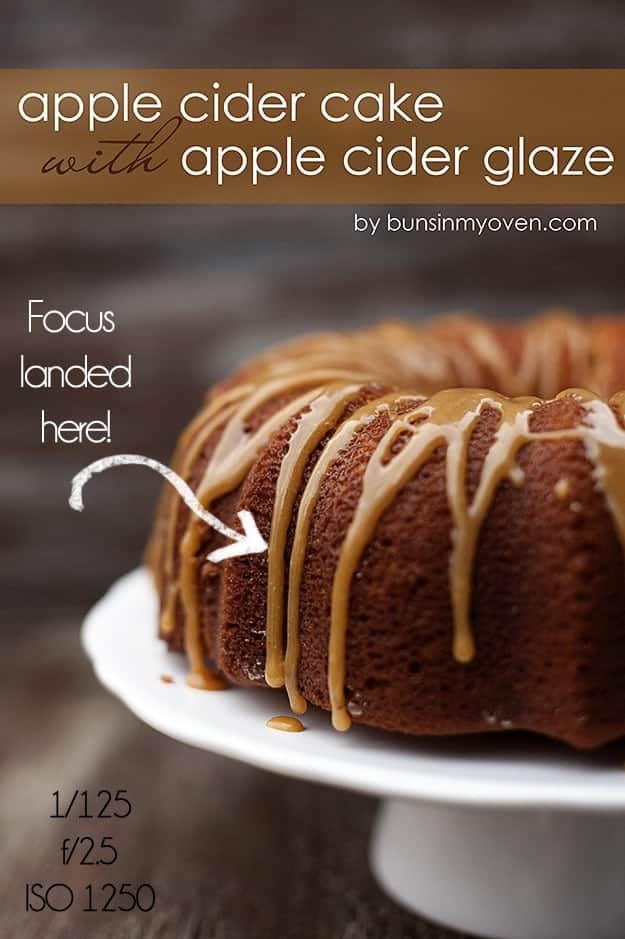
Here’s a good example where not much is in focus. The glaze in the foreground and background is out of focus. Your eye is drawn directly to the middle of the cake where it’s in focus. If I had used a smaller aperture (a bigger number!) more of the cake would have been in focus. If I had used an even smaller number, less of the cake would have been in focus.
In the above shot, I focused on the noodles in the foreground. The fork is blurry and adds a little depth to the image, almost making you feel as if you could reach in and grab it.
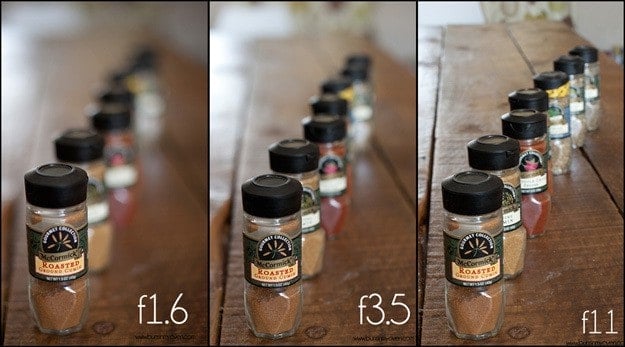
Check out these images, all shot from the same distance at varying apertures.
Personally, I love the first image shot at 1.6. That bokeh is so creamy and gorgeous. Your eye is immediately drawn to the first bottle of spices. Everything else is smoothed out and just sort of fades away. The second image isn’t too bad either. There is still a nice amount of creaminess to the bokeh and you know that the first bottle is the main focus point, though I do feel like the second bottle is competing for my attention a bit. The third picture? Barf. I hate it. First of all, you can see that my messy table needs to be wiped down. Second of all, where should I look? There is so much going on in that image that my eye doesn’t know where to go. Lots of bottles, my curtains, that chair, and a bunch of junk hanging out behind my table. I bet you didn’t even notice that stuff in the first image, but it’s there. It’s just nicely blurred.
The tricky thing about bokeh is that the amount in focus will change depending on your distance to the subject. Really close? Not much will be in focus. Far away? More is in focus.
So, I could shoot something at f4 up close and if I stepped back a couple of feet, I might get the same results by shooting at f2. There are online depth of field calculators that you can use to figure all of this out, but I don’t. Like I said earlier in the series, I’m not math-y. I hate math and I don’t want to hate photography, so I just wing it. With lots of practice, you can figure out what works and what doesn’t. But, if you like math and are good at memorizing things, check out the depth of field calculator.
Whew. I just confused y’all, right?
Let’s recap.
Aperture = Smaller number, less in focus (small depth of field), but more light is let into the camera. Larger number, more in focus (large depth of field) but less light is let into the camera.
If you can digest that, you’ll slowly begin to figure out how much distance plays a part. Practice by taking a photo of something up close at f/3.5. Take a step or to back and take the photo again without changing your settings. Can you tell a difference? How about if you step back 10 or so feet? I bet a lot more is in focus now!
Your homework this week? Play around with different apertures to affect the bokeh in an image. Adjust your shutter speed and ISO as needed (you might try doing this outside in the shade for optimal light, so you don’t need to crank your ISO too high) to change up your aperture. Find a flower (if you’re lucky enough to live where it’s warm enough for that sort of thing) or a mailbox or a cute kid that doesn’t wiggle much and just start playing with different apertures.
Still not confident in manual (and that’s okay! Manual is tricky and will take some time!)? Put your camera into A or Aperture Priority mode and let it choose your shutter speed and ISO. You’ll just adjust the aperture. Try to figure out what works for you! I bet you’ll fall in love with bokeh too!








Teena Agnel | Feed Your Temptations says
Wow! Karly…Beautiful clicks and great article…Wish I had found this when I was struggling with the basic settings.
Samia Alam says
This was so helpful to me as a beginning blogger!! Is there any Nikon you’d recommend for a beginning blogger?
Thank you.
Karen Petersen says
Hi!
I just read all 3 of your posts and loved them. So so helpful. Thank you. Will you consider writing more? Thanks!
Karen
Karly says
Glad they were helpful! I may write more down the line. 🙂
Edward Antrobus - If You Can Read, You Can Cook says
Personally, I think the first spice photo has too much blur. My eye is drawn to the out of focus part instead. #2 would be the winner for me, or even a little further to the right, but I agree that #3 fails to make the ropes the center of attention.
Erin @ Erin's DC Kitchen says
Thanks so much for explaining the these technical terms. I just have a point and shoot which I keep on manual and adjust minimally but there is so much about my camera I don’t understand and my eyes glaze over when reading the manual. Keep the lessons coming!
Kate says
This was so helpful! Thank you!! Trying to figure out a focal point is always difficult for me. I love the look that you’ve achieved in the apple cider cake pic but never knew how to do that. If you’re looking for more topics, I would love it if you would do a post on composition. I have such a hard time with that. Thanks so much! You rock!!