This post may contain affiliate links. Read disclosure policy
Hello, again!
Everyone got their big girl (or boy) panties on? We’re ready to dive into the nitty gritty of manual mode!
Let’s do this.
First things first, I’m going to break down the exposure triangle for you.
What’s exposure? Well, my friend, exposure is the amount of light in your photograph.
A properly exposed image is lit nicely, not too dark, not too light. These Pumpkin Muffins are nicely exposed. Not too light, not too dark. A pretty perfect exposure, if you ask me.
An underexposed image is too dark. Pretty unappetizing, right? When our exposure is off, so is the color of everything. Those muffins? Kinda barfy looking.
An overexposed image is too bright. When the image is too bright, you lose a lot of detail. Those muffin tops are “blown” meaning that there is so much light, the camera can’t read it and you lose detail. No good, man.
When I started out, I was underexposing everything, but once I learned a bit more about photography I started overexposing everything. Finally, I figured out that the middle ground is where I wanted to be.
The key to good exposure is understanding the exposure triangle. Sounds fancy, right? And kinda math-y? I hate math. We’re not really going to talk about math, k?
The three components of the exposure triangle are shutter speed, aperture, and ISO.
The best analogy I’ve come across is to pretend your camera is an eyeball.
The shutter speed controls how fast you blink. The faster you blink, the less movement you see. The slower you blink, the more movement you see. Same goes with shutter speed. If you have a fast shutter speed (1/500 or more, generally speaking), you can take a nice sharp photo of your kid jumping off the diving board into the pool. If you try that same shot with a slow shutter speed (1/125 or less), you’re going to see a lot of blur because your kid is moving and your camera saw that before it “blinked.”
So, to recap, the faster your shutter speed, the quicker your camera’s shutter opens and closes. A good rule of thumb for handheld photography (meaning you’re not using a tripod) of a still subject is to keep your shutter speed double the length of your lens. If you’re shooting with a 50mm lens, you’d want your shutter speed to be at least 1/125. If your subject is moving, even a little, you’ll want to increase the shutter speed.
There are times, of course, that you might want to capture the movement (photographing a moving vehicle or a stream of water rushing over rocks) and you’d use a slower shutter speed to make that happen.
For food shots, I try not to go below 1/125, but I’ve had a lot of practice at standing still while shooting. I brace my arms, hold my breath, and shoot. I can get away with a shutter speed of 1/60 if I’m careful and photographing a still subject. I don’t recommend that, though. If you want to be sure you don’t catch any movement, try shooting at 1/250 to start. And when I’m talking about movement, I don’t just mean movement of your subject! Every time you take a breath, you’re moving your camera! Your finger pressing the shutter button moves the camera. Handholding at a slow shutter speed can be tough!
Now, let’s talk aperture.
Think of the aperture as the pupil of your eye. When there is a lot of light, our pupils are tiny to protect our eyes from too much bright light, right? When it’s dark, our pupils get larger to let in more light.
The aperture of your camera is a hole that let’s in light. When we don’t have a lot of light, we want the aperture opened up. When it’s really bright, you may need to close it down. I prefer the look of a wide open aperture, so I shoot that way 99% of the time. Aperture not only affects the amount of light getting in to your camera, but the blurriness you see in the background or foreground of your image. But, for today we’re only going to discuss aperture as it pertains to exposure.
When you’re in your house trying to get that perfect shot of your pancake and it’s just not very bright, you’re going to want to use a wider aperture. Some lenses will have a range, such as the 18-55mm lens that comes with a lot of entry level DSLR cameras. The lens will have a range of f/3.5-5.6. This means that at 18mm, the widest your aperture can open is f/3.5. At 55mm, the widest your aperture can open is f/5.6. All lenses are different and I highly recommend getting a prime lens with a fixed aperture for learning.the
Just imagine how difficult it will be to learn manual if your aperture changes every time you zoom in or out. If you don’t have a fixed aperture lens, that’s okay! I’d just recommend that you NOT zoom when you’re practicing manual so that you aperture doesn’t suddenly change on you. Once you’ve got the hang of it and can adjust shutter speed or ISO as needed, zoom away.
A prime lens is just one focal length. It doesn’t zoom. Prime lenses tend to be sharper than zooms. The 50mm f/1.8 is around $100 for both Nikon and Canon versions and it’s an excellent lens that is perfect for learning. (Keep in mind that some Nikon cameras require the focus motor to be built into the lens and the $100 50 f1.8 doesn’t have that option – you need the AF-S version which is pricier.) The 50mm has a maximum aperture of f1.8, meaning it can let in MORE light than a f/3.5 lens.
Confusing, right? You’d expect f/1.8 to let in less light than f/3.5, but that’s not the case.
Aperture is a bit backwards. The smaller the number, the more light you’re letting in.
If it’s dark, you may need a smaller number, such as f/1.8 or f/2.8.
We’ll discuss how that affects focus and the background of an image next week. For now, just know that a smaller number means you’re letting in more light and you have LESS in focus. A larger number means you’re letting in less light, but you have MORE in focus.
Now let’s talk about ISO.
Your ISO tells your camera sensor how sensitive it should be to light. If it’s pretty dark, we want our camera sensor to be more sensitive, so that it reads all the light available. If it’s bright out, we’ll want it to be less sensitive to light so that everything isn’t overexposed.
Most cameras have a range of ISO 200 to ISO 3400 or even ISO 6400.
On a sunny day, we’ll use ISO 200. If we’re in our house at night, photographing our kids blowing out their birthday candles, we’re probably going to crank that ISO up pretty darn high, around ISO 3200.
The problem with high ISO? Grain.
The more sensitive to light your camera sensor is, the more grain you’ll have in your photos. Every camera model handles ISO and grain differently, and generally speaking, the lower end cameras do worse and the higher end cameras do better. You get what you pay for when it comes to ISO.
In later weeks I’ll give you some tips for shooting with high ISOs without too much grain.
Now, let’s discuss how it all works together.
Your shutter speed has to be high enough to freeze the image, so everything isn’t blurry. Your aperture needs to be opened up enough (a smaller number, such as f/3.5 instead of f/8.) to let in enough light to expose the image properly. Your ISO has to be high enough to properly expose the image, without being so high that everything is a big ball of grain. It’s a delicate balance, but one that can be achieved in different ways.
Personally, I almost always shoot with my aperture at f2.8 or lower. (The reason I use such an open aperture has less to do with exposure and more to do with bokeh. Bokeh is the background blur and I’m addicted to it. We’ll discuss it in depth next week!)I start with my ISO around 200 and adjust my shutter speed as needed. If it’s a sunny day, I’ll use a fast shutter speed.
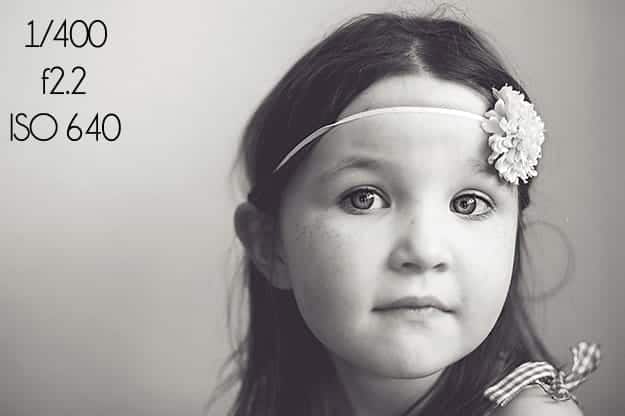
The examples below are of people, but the same things would apply to food.
As you can see in the above photo, I reallllly opened up my aperture. It can be difficult to achieve focus at f/1.4 (and, again, I’ll explain why next week when we discuss nothing but aperture), but I love the look of it. So, I set my aperture where I wanted it, started my ISO at 200, and adjusted my shutter speed from there.
Notice in the above image that we’re inside. We’re about 3 feet from a window to camera right. It was a sunny day, so it wasn’t terribly dark in the house. I put my aperture where I wanted it, and placed my shutter speed at 1/400. My daughter tends to be a wiggle monster, so I knew I would need a faster shutter speed with her. I adjusted my ISO from there. I normally try to stick with the standard numbers, 200, 400, 800, 1200, 1600, and 2400. I find that I get more grain on the in-between numbers, such as 640. I must not have been paying a lot of attention this day, though. 😉 It wasn’t a problem though, because I properly exposed the image, so grain wasn’t an issue.
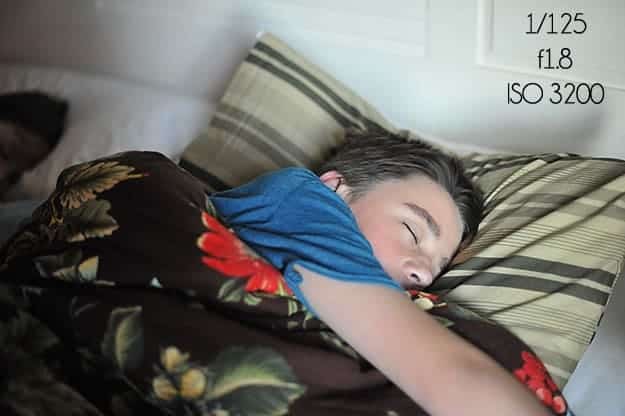
Looking at the above photo, you’d think he was sleeping in the middle of the day. It was actually pretty dark in the room. If I was being all creative and moody, I could have left the image darker to show that he’s sleeping in a dark room, but I’m here to show you how to get a bright image in a dark room, right? He was sleeping, so I didn’t think he’d be moving. I set my shutter speed to 1/125 and opened up my aperture to f1.8 (the widest open I could get it on this particular lens) to let in as much light as possible. I adjusted my ISO from there.
So, the above images show three completely different settings with proper exposures. There are a lot of different ways to achieve a perfect exposure!
Your homework for this week? Bust out your camera manual and figure out how to adjust shutter speed, aperture, and ISO. Each camera model is a bit different, so you’ll need to read your manual for that! Once you’ve figured that out, start practicing! Take a picture of your breakfast, lunch, and dinner and pay attention to how your “recipe” for the perfect exposure changes. You might need a low ISO and high shutter speed for lunch, because it’s usually pretty bright in the middle of the day. At dinner, you’ll probably be on a lower shutter speed with ISO cranked up there!
The best way to learn and understand how this all works is get out there and practice! Take your camera off of Auto, put it in Manual, and just try!
Any questions? Leave them in the comments and I’ll do my best to answer them!
Next week? It’s all about aperture – my favorite setting on my camera!






Emily Honeycutt @emilyhoneycutt.com says
Hi Karly,
Thanks so much for this super-informative post. I’m still learning about food photography, and my DSLR in general, (though I try to fake it!). Having some basic guidelines and clear explanations like this are really helpful. I’ll return to your site again. Your photos and website are beautiful!
Linda Lyle says
Hi Karly,
Thank you so much, this is one area of photography that I have not previously thought of entering, then why would anyone wanna look at my sad offerings. lol
My son is into landscape photography while I am a general and trick shot photographer, but what I took away from your article is is the straight forward way in which you pass on the information. Cheers Linda
Linda owns the website at http://createyourownphotoblog.com Trick Photography, Photoshop Tricks, Photography Tips and tricks.
To Check it out Go to http://createyourownphotoblog.com. We never stop learning.
Anna says
Great posts Karly. I understand all the terms, however I am a little confused about you make it all work together so that you end up with a well exposed picture. How do you set your camera? I was always told to start with ISO, speed and aperture. I try to learn the 125 – 8 – 100 exposition triangle but it doesn’t seem to work. Do you have any better tips? Thank you! 🙂
Karly says
Hi Anna!
I’m not sure what the 125 – 8- 100 triangle is. There really isn’t any one setting that would work in every situation since they all have to work together based on the light.
I set my camera by looking at my meter. I will usually set my ISO to what I think will be needed based on available light, set my apperture where I want it based on what I want to be in focus, and then adjust my shutter speed to get a correct exposure. 🙂
Amber (Sprinkled With Flour) says
Great series Karly! So well explained and really great tips. 🙂
lisa@cookingwithcurls says
Thank you sooooo much for helping me understand photography. You explained it in a way that my brain could finally understand it.
I have a very nice point and shoot Nikon, so I cannot change lenses, shoot in RAW, or even adjust the white balance. Hopefully I can “upgrade” once I master using the maual settings on my current camera.
I was so excited, that I gave you a huge shout out on my blog this morning 🙂
Karly says
Yay! So glad it clicked for you! 🙂
Anna {Herbivore Triathlete} says
The exposure triangle can be so overwhelming at first and the eyeball analogy really is helpful in understanding it better.
I currently only have the “kit lens” plus a zoom lens for my Canon Rebel XT (it’s old, lol) but am dying to get the “nifty fifty”. Soon I hope!
Jocelyn @BruCrew Life says
Well, I just realized why I delete so many blurry food pictures…I usually shoot at 1/50 or 1/60. I keep trying the tripod to help, but it makes me feel so constricted! Ok, I will be up-ing that speed and lowering my f-stop and bumping up my ISO. Eeeiiik so many things to think about.
Danielle says
I’ve switched back and forth between manual and aperature mode for a while now and basically I keep using the AV mode as my crutch. Anytime I’m in a hurry to get dinner on the table and don’t have time to think about the parts of the eyeball, which direction to go, etc, I just switch it to AV and know that I’ll have a better chance of getting it right. I know that practice is the only way to overcome my paralysis but finding the time is another story. Thanks for your awesome tutorial. I love the eyeball analogy and think it’s the best I’ve heard. I found myself literally blinking my eyes as I read you post 🙂 Can’t wait to read more!!
Megan says
Thank you thank you thank youuu. This is REALLY helpful. I shoot in manual every once in a while, but end up getting confused, but auto often doesn’t do what I want it to! I will refer back to this continuously!